What are JSON Web Tokens (JWT) used for?
Learn what JWTs are, how they work and what you can use them for.
Traditionally, web apps used cookies to store user sessions. When a user logged in, the app saved their info on the server, then sent back a session ID cookie. The user would then send the session ID with each request and the app would use it to look up the user’s session data.
While this worked (and still does for some apps), it didn’t work well with stateless architectures.
Enter JWTs (JSON Web Tokens). JWTs are compact and self-contained JSON payloads that contain all the necessary data to authenticate users, negating the need to make a database call every time you want to verify a user’s details.
In this article, we’ll explain more about JWTs, touching on their structure, how they secure data, and the benefits of using them. By the end, you'll know whether JWTs are the right authentication option for your app - and how you can implement them using Node.
What exactly is a JSON Web Token (JWT)?
A JSON Web Token (JWT) is an open standard for securely transmitting information between different systems as signed JSON objects.
In an authentication context, JWTs are commonly used in the OAuth 2.0 and OpenID Connect (OIDC) protocols. In OAuth 2.0, JWTs are used as access tokens - while in OIDC they’re commonly used as ID tokens to encapsulate user identity information (email address, name, roles, etc.)
A JWT typically consists of three distinct parts:
- Header
- Payload
- Signature
Header
The header specifies the token type (JWT) and the signing algorithm used to create the token’s signature (like HMAC SHA256 or RSA).
Below is an example of a JWT header:
The alg (algorithm) is set to HS256, representing the HMAC SHA-256 hashing algorithm, a common algorithm used for JWTs, and the typ is set to JWT (type of token).
Your app needs to Base64URL encode the header to form the first part of the JWT. Here’s what an encoded version of the above header looks like:
eyJhbGciOiJIUzI1NiIsInR5cCI6IkpXVCJ9
Payload
The second part of the token is the payload. It contains the claims – pieces of information about the user.
Below is an example of a JWT payload:
This payload has the following JWT claims:
- sub (Subject): Represents the subject of the JWT, for example, a user ID.
- email: A custom claim specifying the user’s email.
- admin: A custom claim specifying the user’s role.
- iat (issued at): Contains the exact time you issued the JWT. Expressed in seconds since the Unix epoch.
- iss (Issuer): Identifies who issued the token which is often you or your server.
- exp (Expiration): Specifies the exact time when the JWT expires. Expressed in seconds since the Unix epoch.
sub, iat, iss, and exp are claims pre-defined by the JWT specification and are referred to as registered claims. You don’t have to use them but it’s recommended. You can see the full list in the JWT claims registry. Email and admin are private claims defined by you.
Similar to the header, your app also Base64URL encodes the payload, to create the second part of the JWT.
Here’s the encoded version of the above payload:
eyJzdWIiOiI1NTBlODQwMC1lMjliLTQxZDQtYTcxNi00NDY2NTU0NDAwMDAiLCJlbWFpbCI6ImhncmFuZ2VyQGhvZ3dhcnRzLmV4YW1wbGUiLCJhZG1pbiI6InRydWUiLCJpYXQiOjE3MDMyNjc0NjgsImlzcyI6InlvdXItc2Fzcy1hcHAiLCJleHAiOjE3MDM2OTk0Njh9
Signature
A signature is used to verify that the sender of the JWT is who they say they are and to ensure that the message wasn't tampered with along the way.
To create the HS256 signature used in this example, you:
- Concatenate the encoded header and the encoded payload separated by a dot(.) to form a string like this:
data = encoded_header.encoded_payload
- Create a hash of the concatenated data using the HMAC SHA-256 algorithm if that is what was specified in the JWT header.
- Base64URL encode the hash to get the signature.
- Combine the encoded header, payload, and signature (separating them with a dot) to create a JWT.
JWT=encoded_header.encoded_payload.encoded_hash
Here’s an example of a JWT for the header and payload data we’ve been using:
eyJhbGciOiJIUzI1NiIsInR5cCI6IkpXVCJ9.eyJzdWIiOiI1NTBlODQwMC1lMjliLTQxZDQtYTcxNi00NDY2NTU0NDAwMDAiLCJlbWFpbCI6ImhncmFuZ2VyQGhvZ3dhcnRzLmV4YW1wbGUiLCJhZG1pbiI6InRydWUiLCJpYXQiOjE3MDMyNjc0NjgsImlzcyI6InlvdXItc2Fzcy1hcHAiLCJleHAiOjE3MDM2OTk0Njh9._PSZ4_OdZnp7Rcg35ocnTq9ol7-y_LHl7DvnTPBLKjU
Try generating a JWT yourself by modifying the payload and the secret string or the hashing algorithm in jwt.io.
You should see something similar to the screenshot below:
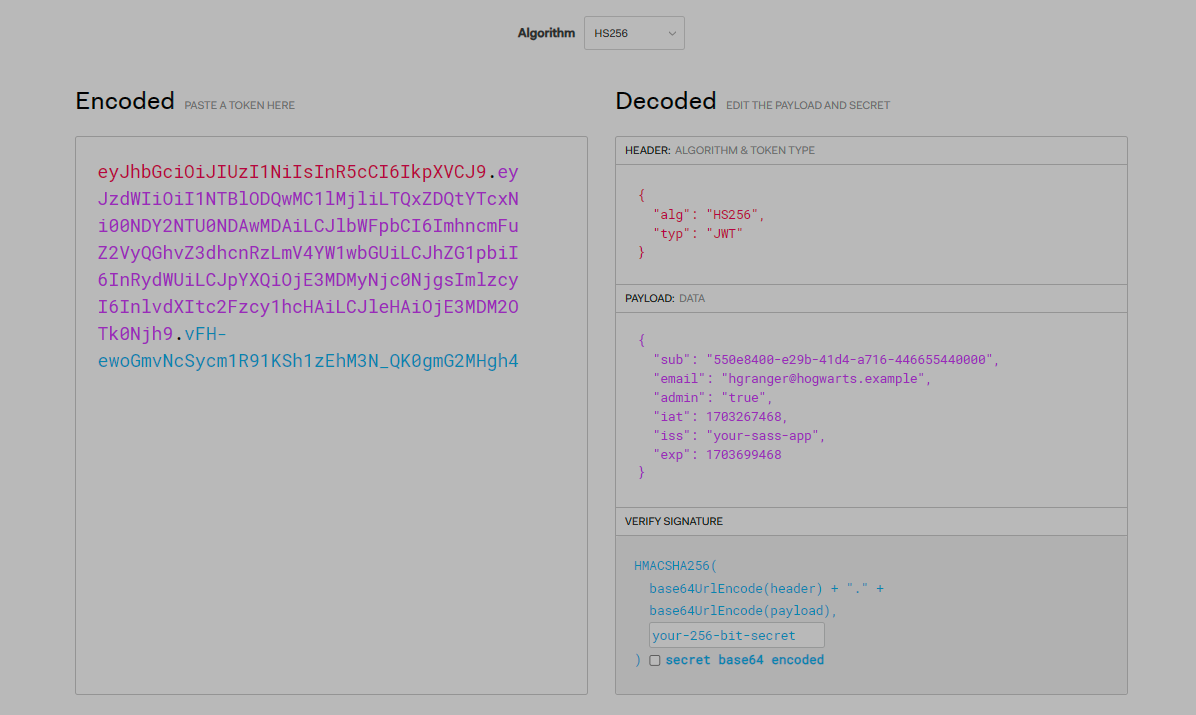
Notice how the JWT changes when you use different values for the payload, secret or algorithm.
How do JSON Web Tokens work?
JWT-based authentication works as follows:
- A user attempts to log in to your app. For example, they might submit an email and password through a login form or you might redirect them to an identity provider.
- Your app or an authentication server validates their details and if correct, generates a JWT. This token contains the user's information and some other claims about the token like the expiry date (exp).
- Your app sends the JWT to the user who stores it, often in the browser’s local storage or as a cookie.
- The user includes this token in the header of their subsequent HTTP requests to your app.
- Once your app receives a request, it decodes the JWT and validates it.
- If the JWT is valid, your app processes the user’s request.
How do JWTs secure data?
A JSON Web Token (JWT) secures data using a digital signature.
This signature is generated based on the token's payload (the content of the token) and the algorithm used to create the signature.
It stays the same unless the payload or the algorithm changes – altering even a single character in the payload will result in a new, different signature.
When your app receives the JWT, it recalculates the signature using the same algorithm and the payload within the token. If this recalculated signature doesn't match the original one that came with the JWT, it means the data within the token was tampered with after it was issued. However, if both signatures match, you know the token was not modified and you can safely grant the user access.
Another way you can reduce security risk is by adding an expiration date (exp claim) to a JWT – it reduces the amount of damage an attacker can do if they intercept a JWT. For example, if a token expires in 15 minutes, it’s only valid within that time. Even if an attacker gets a hold of it, they have a limited time to misuse it.
Just keep in mind that while shorter expiration times reduce security risks, users will need to log in more often. But that’s avoidable – use refresh tokens to automatically request a new JWT without involving the user.
Why use JWTs?
JWTs have several benefits including:
- Simple to use
JWTs use JSON which is easy to read and understand. Plus, there’s a wide array of libraries for multiple programming languages that simplify the encoding and decoding process.
- Scalability
JWTs are self-contained – they contain all the information required to authenticate users.
This eliminates the need for constant database queries with each request. Meaning, even as the number of requests your app needs to process increases, there won’t be a significant drop in performance.
However, note that JWTs can become large if too much data is embedded within them which can increase the size of HTTP requests, potentially impacting network performance.
- Highly customizableJWTs can carry a wide range of information in their payload, from standard claims specified by the JWT specification (like the issuer, subject, and expiration time) to custom claims that can include user roles, permissions, and other app-specific data.
- Cross-domain support
JWTs enable a decoupled authentication system. Since the JWT contains all necessary information for the service to validate the token's authenticity and integrity, there's no need for a service to directly communicate with the authentication server. So once the authentication server issues a token, this token can be used to access services or APIs hosted on different domains.
Are JWTs right for your project?
JWTs might be the right authentication option for your project if:
- You need to authenticate a lot of users
Traditional authentication methods often require database lookups to verify the user with each request. This can introduce a huge performance bottleneck. With JWTs, user identity data is encoded within the token itself, making querying a database unnecessary.
- You are building a RESTful API
RESTful APIs are designed to be stateless – each request from a client to the server must contain all the information needed for the server to fulfill that request. JWTs are perfect for these APIs as the required data can be encoded in the payload. If you’re using OAuth 2.0, for instance, JWTs can be used to encode all the relevant parts of an access token.
- You want to support role-based authorization
You can include claims to specify user’s roles or permissions in the JWT payload then use that data to implement role-based authorization. Consider an admin claim that can either be true or false. You can grant or restrict access to specific parts of your app depending on its value. Some parts of the dashboard might only be visible to an admin only, for example.
- You want to enable SSO via the OIDC protocol
OIDC uses JWTs for its ID tokens. When a user logs in using OIDC, the authentication server issues a JWT token containing authenticated user information. You’ll need to decode this JWT and validate it (check the expiry date and where it’s from) before granting user access. This process is not terribly difficult – most programming languages have packages specifically meant for this job.
JWTs may not be the best option if:
- Your app highly prioritizes security
Signing a JWT token only prevents users from manipulating the payload data, it doesn’t encrypt it. Someone with access to a JWT can decode the payload and view the data as plain text. For highly sensitive data, you may want to use an authentication method that stores user data on the server side.
- You frequently revoke user access.
Revoking JWTs often involves maintaining a blocklist of invalidated tokens which doesn't scale well. If you need to revoke a user’s access frequently, session IDs might be a more suitable choice.
- You aren’t comfortable implementing cryptographic code
Securely validating a JWT requires experience and a careful attention to detail. A simple mistake in validating a JWT could open up a major security vulnerability.
Implementing JWT Authentication
The easiest way to add JWT authentication to your JavaScript app is to use an npm package.
Below we’ll walk through the process of generating and verifying JWTs using the jsonwebtoken package.
Installation
First, you need to install the package in your Node.js project:
npm install jsonwebtoken
Importing the Package
In your Node.js file, import the package:
const jwt = require('jsonwebtoken');
Generating a JWT
To create a token, you use the sign method. You need to provide a payload (which is the data you want to encode), a secret key, and an expiry time.
const token = jwt.sign({ email: 'hgranger@hogwarts.example'}, 'secretKey', { expiresIn: '1h' });
In this example, the email is the payload, 'secretKey' is the key used to sign the token, and { expiresIn: '1h' } means the token will expire in one hour.
Note: the jwt.sign() method uses the HS256 hashing algorithm by default, so you don’t need to specify a hashing algorithm.
Verifying a JWT
To verify a token and decode the data, use the verify method. You need the token and the same secret key used to sign it.
try
This will either return the decoded payload if the token is valid or throw an error if it's not valid or expired.
Conclusion
Implementing JWTs is not necessarily difficult. But in most cases, it’s just one of the authentication options you want to enable in your app.
For enterprise apps, you must consider supporting SSO authentication, and luckily you can do so using just a few lines of code through WorkOS.
- Get started fast: With SDKs for every popular platform, and Slack-based support, you can implement SSO in minutes rather than weeks.
- Avoid the back-and-forth: WorkOS’ Admin Portal takes the pain out of onboarding your customers’ IT teams and configuring your app to work with their identity provider.
- Pricing that makes sense: Unlike competitors who price by monthly active users, WorkOS charges a flat rate for each company you onboard - whether they bring 10 or 10,000 users to your app.