5 Examples of SCIM Implementation
Discover how SCIM endpoints work, see examples of 5 key operations they should handle, and find out an easier way to manage SCIM without creating your own endpoint.
The System for Cross-domain Identity Management (SCIM) specification is a protocol that defines a set of RESTful APIs for user provisioning and management.
If you’re developing an app for enterprise customers, you can create a SCIM implementation that identity providers (IdPs) can connect to, allowing your customers to automatically provision users in your app.
While every IdP has some unique approaches to how they use SCIM, you’ll be able to support the widest range of providers by precisely following the SCIM spec.
In this article, we’ll walk you through the structure of a SCIM endpoint, run you through examples of the five most common SCIM operations your endpoint needs to support — and show you an easier way to support SCIM than building your own endpoint.
Overview of a SCIM Endpoint
SCIM offers a standard method for representing user identity information by defining a uniform model for representing an identity resource and a RESTful API for managing it via CRUD operations.
SCIM 2.0 primarily defines two types of resources — Users and Groups which are derived from the Resource object.
Here’s an example of the data model.
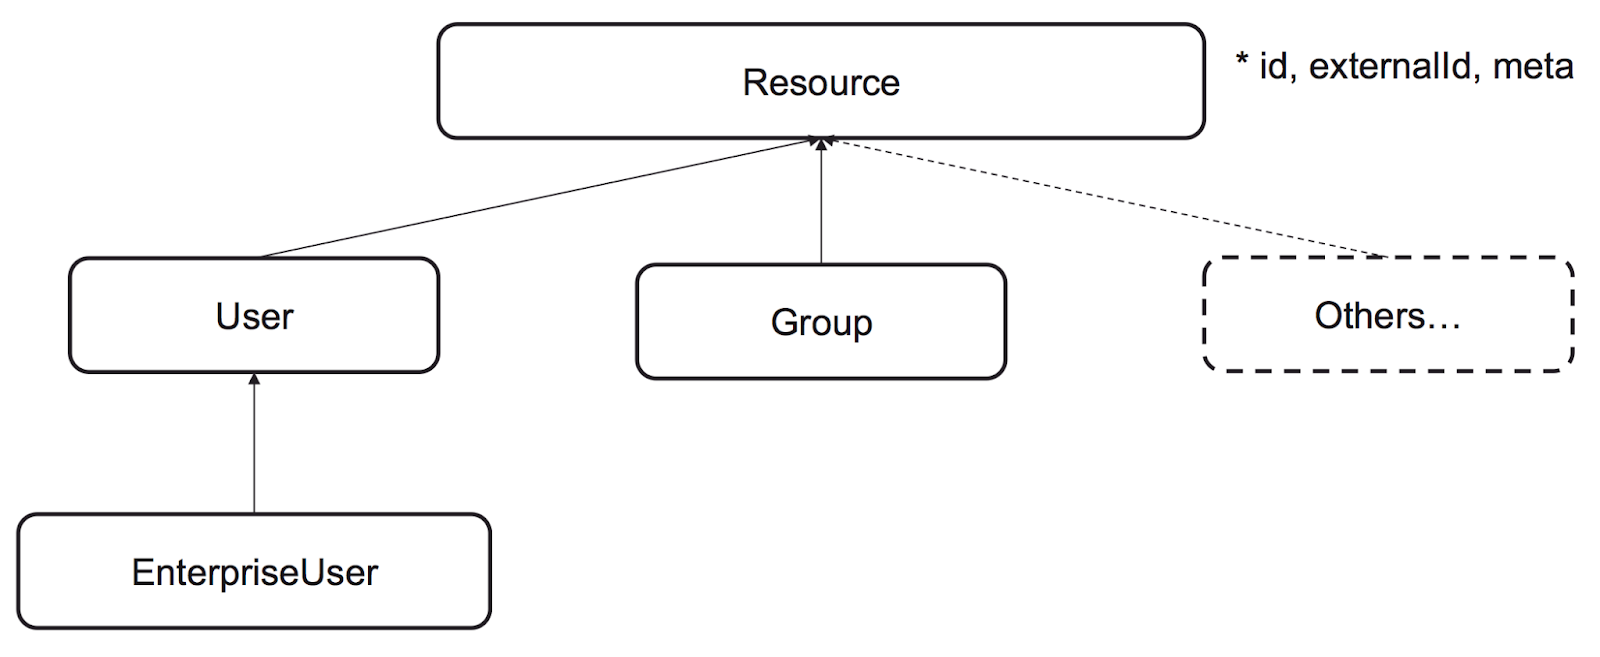
A User resource typically represents users in an organization, while a Group resource represents users grouped together based on their access levels or permissions.
These resources are stored in a consistent way which makes it easy for your customers to share user information with your app and vice versa. This means you, as the service provider, can create a RESTful SCIM endpoint to allow customers to automatically create, read, modify, or delete users or groups based on changes in their identity provider.
A SCIM endpoint is where your customer’s IdP sends SCIM requests for your app. Here’s an overview of everything you need to know about a SCIM endpoint:
Endpoint structure
Handily, the endpoint for users is /Users and for groups is /Groups. You can also include the SCIM protocol version in the URL. For example, /scim/v2/Users indicates that the SCIM version is v2 and the resource is Users.
Authentication
SCIM does not define a specific authentication scheme for authenticating requests you receive on your endpoints. You can use bearer tokens, basic authentication, and cookies among others.
HTTP Methods
SCIM is RESTful, based on the HTTP protocol, and defines different methods for different actions. Create a POST is used to create new resources (like users or groups), PUT and PATCH to update resources, and DELETE to delete resources.
Schema
SCIM relies on a standardized schema to define the attributes of a user. The schema ensures consistency in user data representation across different systems. When integrating with an IdP, it's crucial to understand the specific attributes it uses in its schema, including any unique or custom ones it has added beyond the standard schema. Understanding this allows you to map the attributes correctly to the corresponding fields in your app’s data model.
When it's your turn to send data back or respond to requests using SCIM, it's equally important to stick to the SCIM schema standards so that the IdPs can understand your responses.
SCIM examples for your own endpoint
Here are 5 examples of how identity providers can use your SCIM endpoints to manage users in your app.
Example 1: How to provision a user
Before sending a request to provision a user, most IdPs will do a GET to /Users with a search for the email of the user to check whether the user already exists in your system.
Here’s an example:
GET /scim/v2/Users?filter=userName%20eq%20%22hermione%40hogwarts.example%22
Once you receive the request, respond with the User object if there’s a match or a HTTP 404 Not Found, if no User object matches the email. E.g:
The SCIM protocol uses the POST /Users endpoint to provision users. Before creating this endpoint, first decide which attributes you need an IdP to submit in order to provision a user in your app.
The example below uses the userName, name, and email.
Example request
POST /Users
Request body
In addition to the user data you receive from the IdP, you must create and return a unique ID for the user as the service provider. This ID is case-sensitive and read-only. In this example, we are using “550e8400-e29b-41d4-a716-446655440000” (a UUID) as the ID for the user.
You should also return an attribute named meta containing information describing the resource you created.
After provisioning the user, your endpoint should return a HTTP 201 Created response with the provisioned user’s data in the response body.
Example response
Example 2: How to return a user's details
To return a user by ID, implement a /Users/{id} endpoint in your SCIM API. The IdP will use the same user ID you returned when the user was originally provisioned in the previous example.
Here’s a sample request you might receive.
Example request
GET /Users/550e8400-e29b-41d4-a716-446655440000
Your endpoint should check if the user exists. If they do, respond with status code HTTP 200 OK and include the user data in the response body.
Example response
Example 3: How to update user details
The SCIM protocol specifies two endpoints for updating a user’s details:
- PUT /users/{id} - Overwrites all of the user’s attributes at once.
- PATCH /users/{id} - Updates only specified attributes.
Example Request: Updating User With PUT
You’ll need a PUT /users/{id} endpoint in your SCIM API. This means an IdP can then call this endpoint and provide the attribute values in the request body that you’ll update the user resource with. The request body may contain the entire user payload or only a partial payload. In either case, it's best to implement this endpoint assuming the request body contains a partial payload.
Here’s an example of such a request:
Note that in this example, we’re updating the username and email address of the user.
Endpoint
PUT /Users/550e8400-e29b-41d4-a716-446655440000
Request body
Example response: Updating user with PUT
Once you update the user, respond with the entire updated User object.
Example request: Updating user with PATCH
As mentioned, the PATCH /Users/{id} allows an IdP to update one or more attributes of a SCIM resource using the JSON Patch standard.
For example, an IdP may send a request to update a User resource with a new nickname.
Endpoint
PATCH /Users//550e8400-e29b-41d4-a716-446655440000
Request body
Example response: Updating user with PATCH
In your response, return the updated user.
Example 4: How to add a user to an access group
To add a user to a group using SCIM, you must create a PATCH /Groups/{groupId} endpoint. The IdP sends a PATCH request to this endpoint, including the group ID in the URL, and the user's ID that should be added to the group in the request body.
This allows the IdP to specify which access groups a user belongs to and thus which resources they can access in your app.
The following is an example request from an IdP.
Example request
Note that this example assumes that the group being updated already exists
Endpoint
PATCH /Groups/abf4dd94-a4c0-4f67-89c9-76b03340cb9b
Request body
This request uses the add operation specified by SCIM to add a user to an existing group named “Gryffindor house”.
Your endpoint should respond with the updated Group resource including the new member.
Example response
Example 5: How to suspend a user
How your app suspends a user usually depends on how an IdP deactivates users.
For IdPs that send PATCH requests to set users as inactive, you can create a PATCH endpoint that sets the active attribute to false.
Here’s an example of a PATCH request from an IdP:
Example request
Endpoint
PATCH /Users/550e8400-e29b-41d4-a716-446655440000
Request body
The response you send back should indicate the user is no longer active:
Example response
An organization might also suspend a user using the DELETE Users/{id} endpoint.
Example request
Endpoint
DELETE /users/550e8400-e29b-41d4-a716-446655440000
Once you’ve suspended the user return an HTTP 204 OK response
Example response
204 NO CONTENT
While the SCIM protocol provides a standard method for suspending users, different IdPs can interpret it differently. As a result, there’s a lack of uniformity in how IdPs suspend users. For example, one IdP might set the user as inactive, another one might delete the user, requiring you to create a new user if they are re-activated.
These inconsistencies are challenging when your app supports multiple IdPs, as you'll need to handle and process distinct sets of information.
Next steps: Use WorkOS instead
Prefer a done-for-you approach and don’t want to spend days building a SCIM endpoint and handling each IdPs idiosyncrasies?
Directory Sync by WorkOS allows you to quickly enable SCIM provisioning from all major corporate identity providers with a straightforward, API-based integration.
- Get started fast: With SDKs for every popular platform, and Slack-based support, you can implement Directory Sync in minutes rather than weeks.
- Events-based processing: While webhooks are also supported, WorkOS’ Events API means every SCIM request is processed in order, and in real-time. You’ll never miss a provisioning request again.
- Pricing that makes sense: Unlike competitors who price by monthly active users, WorkOS charges a flat rate for each company you onboard — whether they’re syncing 10 or 10,000 users with your app.